시간 설정
rdate -s time.bora.net
ulimit 설정
* soft nofile 102400
* hard nofile 102400
neptune soft nproc 10240
neptune hard nproc 10240
cat /proc/sys/net/core/rmem_default
cat /proc/sys/net/core/rmem_max
cat /proc/sys/net/core/wmem_default
cat /proc/sys/net/core/wmem_max
cat /proc/sys/net/core/netdev_max_backlog
cat /proc/sys/net/core/optmem_max
cat /proc/sys/net/ipv4/tcp_rmem
cat /proc/sys/net/ipv4/tcp_wmem
sysctl.conf에 수정
net.core.rmem_default = 4194303
net.core.rmem_max = 16777215
net.core.wmem_default = 4194303
net.core.wmem_max = 16777215
net.core.netdev_max_backlog = 100000
net.core.optmem_max = 4194303
net.ipv4.tcp_rmem = 1048576 16777216 33554432
net.ipv4.tcp_wmem = 1048576 16777216 33554432
net.ipv4.tcp_fin_timeout = 10
net.ipv4.ip_local_port_range = 1024 65535
net.ipv4.tcp_tw_recycle= 1
net.ipv4.tcp_tw_reuse= 1
echo "4194303" > /proc/sys/net/core/rmem_default
echo "16777215" > /proc/sys/net/core/rmem_max
echo "4194303" > /proc/sys/net/core/wmem_default
echo "16777215 " > /proc/sys/net/core/wmem_max
echo "100000" > /proc/sys/net/core/netdev_max_backlog
echo "4194303" > /proc/sys/net/core/optmem_max
echo "1048576 16777216 33554432" > /proc/sys/net/ipv4/tcp_rmem
echo "1048576 16777216 33554432" > /proc/sys/net/ipv4/tcp_wmem
TCP TIME_WAIT이 많이 발생하여 문제가 되는 경우
#sysctl -p
cp_time_wait 은 TCP/IP 프로토콜에서 통신채널을 끊을때 (TCP_FIN) 발생하는 시간으로 연결을 완전히 끊기 전에
클라이언트로 부터 받을 데이터를 못 받게 되는 상황에 대비하여 완전히 끊기 전에 기다리는 시간이다.
만일 시스템에 설정된 양보다 대량의 요청이 발생되게 된다면 WAIT 하는 세션들이 필요이상으로 많아질 것이다.
실제 WAIT 중인 세션들은
# netstat -an | grep TIME_WAIT
명령으로 확인할 수 있다.
그럼 OS의 tcp_time_wait 수치를 확인하려면
# cat /proc/sys/net/ipv4/tcp_fin_timeout
60
시간은 초단위이고 기본값은 60이다. 대량의 요청이 발생한다면 10초 정도로 맞춰주는게 권장값이다.
# echo 10 > /proc/sys/net/ipv4/tcp_fin_timeout
명령으로 현재 파라미터 값을 조정할 수 있다.
재부팅시에도 이 값을 유지하고 싶다면
/etc/rc.local 등에 위 명령을 넣거나
/etc/sysctl.conf 에
net.ipv4.tcp_fin_timeout = 10
라인을 추가해준다.
client Port range 변경
매우 바쁜 클라이언트 프로그램일 경우 대량의 TIME_WAIT 가 발생해서 할당해야 될 PORT가 부족할 경우 범위를 늘리는것으로
어느정도 개선이 됩니다. 다만 임시적인 방법이지 완전한 문제를 해결 한다고는 볼 수 없다.
/proc/sys/net/ipv4/ip_local_port_range
보통 32768 61000 으로 지정되어 있는데 , 1024 65535 로 변경
#echo "1024 ~ 65535" > /proc/sys/net/ipv4/ip_local_port_range
/etc/sysctl.conf 에
net.ipv4.ip_local_port_range = 1024 65535
tcp_tw_recycle 기본값이 0인데, 1로 할 경우 TIME_WAIT 상태를 빠르게 recycling 하도록 도와준다.
# echo 1 > /proc/sys/net/ipv4/tcp_tw_recycle
/etc/sysctl.conf 에
net.ipv4.tcp_tw_recycle= 1
tcp_tw_reuse 기본값은 0인데, 1로 할 경우 TIME_WAIT 상태의 소켓을 재사용 할 수 있게 해준다.
setsocketopt() 에 SO_REUSEADDR를 사용한 것과 같은 효과
# echo 1 > /proc/sys/net/ipv4/tcp_tw_reuse
/etc/sysctl.conf 에
net.ipv4.tcp_tw_reuse= 1
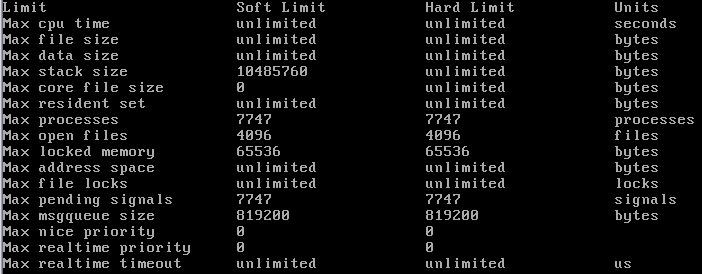
Sometimes you may want to set limits on some of your system resources(Processes, Files)But other times, you may want to do the just the opposite - disable those limits or change them to higher limits like I needed to do few days ago.1. Check what are the limits
Apparently, RedHat set the default max number of open files for users to 1024 and and not long ago, this was change to 4096.For some applications/users this is very low and can cause you a lot of problems.
You can check what is the current limit with ulimit using bash shell:This will show you the hard limit of maximum number of files for your user. you can use -S to check the soft limit.tcsh: using tcsh you can can check this limit with limit descriptors
if you wish to check the max Open file descriptors for the process your user/application running, use the following command: 1 | cat /proc/[Process ID]/limits
|
To check what is the system limit for number of files descriptors use the following command:
1 | cat /proc/sys/fs/file-max
|
2. Change the limit
lets start by changing the limit for the user mario:
1 | vi /etc/security/limits.conf
|
1 2 | mario soft nofile 4096
mario hard nofile 20480
|
If you want to set maximum number of processes use nproc instead of nofile
If you want to set this setting to all users use * instead of specify user name
Now lets change the limit for the entire system:
and put the line:
update the system with::
3. List number of open files/allocated file handles
To check the number of files opened on your system, use:
You can also check the allocated file descriptors by using:
1 | cat /proc/sys/fs/files-nr
|
the first field is the number of total allocated files descriptors.
second field is unused file descriptors
and the third field is the maximum file descriptors that can be used
아파치 user 계정으로 실행
chown root.root httpd
chmod +s httpd
1) GRANT 명령을 통한 추가 (한방에 추가(명령 한번으로 사용자를 추가))
GRANT ALL PRIVILEGES ON 접근 허용 할 DB 이름.* TO 'new_user_id'@'%' IDENTIFIED BY 'new_user_password' WITH GRANT OPTION;
모든 테이블에 접근 하기위해서는 접근 허용 할 DB 이름.* ==> *.*
'new_user_id'@'%' 에서 '%'의 의미는 신규 계정이 접속할 위치의 제한을 두지 않겠다는 의미.
예) 'new_user_id'@'localhost' localhost 로 접속을 하였을 경우만 허용
'new_user_id'@'127.0.0.1' 127.0.0.1 로 접속 하였을 경우만 허용
'new_user_id'@'192.168.0.100' '192.168.0.100' 에서만 접속 허용.
yum install php-pear
pear channel-discover pear.nrk.io
pear install nrk/Predis
pear channel-discover pear.apache.org/log4php
pear remote-list -c log4php
pear install log4php/Apache_log4php
yum install php php-opcache php-xml php-mcrypt php-gd php-devel php-mysql php-intl php-mbstring php-pear php-pecl php-xmlrpc
완료